
MizunoHana - Open Source Automatic Plant Watering System created using Appwrite and Arduino


The term "MizunoHana" is a combination of two Japanese words: "Mizuno," meaning water, and "Hana," meaning flower. The name represents the concept of nurturing and caring for plants, which holds great significance in Japanese culture.
With the advancement of IoT technology, automating irrigation systems has become easier than ever. In this blog post, we will explore how to create a smart irrigation system using NodeMCU ESP8266 and the Appwrite platform. By leveraging the power of microcontrollers, sensors, and cloud connectivity, we can efficiently monitor soil moisture levels and automate the water pump based on real-time data. Let's dive into the details of the components, circuitry, and code that make this system possible.
Team Members🎇
Project Link 🎉
The repository is created by my team member Preetam Rane
Dashboard Link 🎉🎉: https://mizunohana.netlify.app/
Download Android App📱: https://github.com/Preetam2114/water_pumping/releases/tag/1.0.0
Dashboard Credentials (If you don't want to create an account)
email: admin@gmail.com
password: 123123123
Tech Stack & Components Required
Because this technology is open source and free, My teammate and I chose Appwrite, an open-source Firebase alternative, for our project. MizunoHana Dashboard was built with Appwrite's functions, database, and authentication. The appwrite functions are used to save data from the Arduino to the appwrite database. It also sends users an email when the water starts pumping.
To build our smart irrigation system, we will need the following components:
- NodeMCU ESP8266: A versatile microcontroller board with built-in Wi-Fi capabilities.
- Soil Moisture Sensor Module: Measures the moisture level in the soil.
- Water Pump Module: Controls the water pump for irrigation.
- Relay Module: Acts as a switch to control the high-power water pump.
- DHT11 (optional): A digital temperature and humidity sensor for environmental monitoring.
- Connecting Wires: To establish the necessary connections between the components.
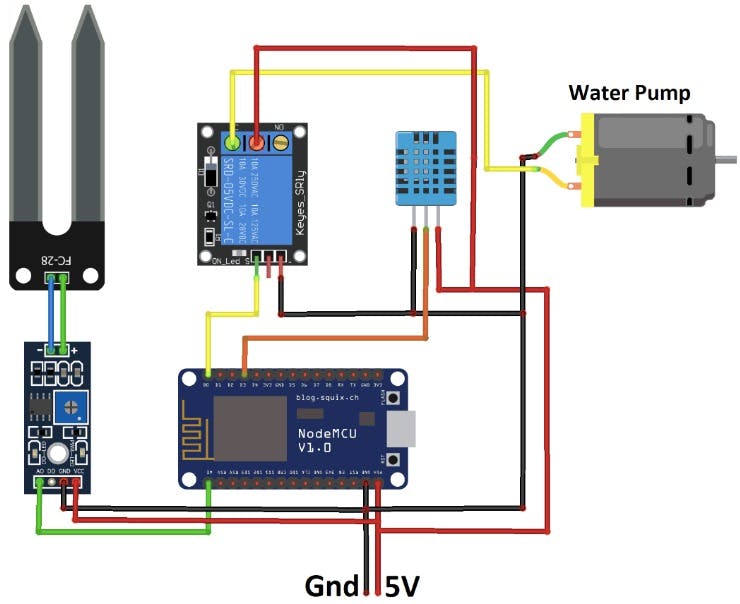
Circuit Design
The circuit design involves connecting the components as follows:
1. NodeMCU and Soil Moisture Sensor:
- Connect VCC and GND pins of the sensor module to 3.3V and GND pins of NodeMCU, respectively.
- Connect the AO (analog output) pin of the sensor module to the A0 pin of NodeMCU.
2. NodeMCU and Relay Module:
- Connect VCC and GND pins of the relay module to 3.3V and GND pins of NodeMCU, respectively.
- Connect the IN1 (input 1) pin of the relay module to the D3 pin of NodeMCU.
3. Relay Module and Water Pump:
- Connect one terminal of the water pump to the COM (common) pin of the relay module.
- Connect the other terminal of the water pump to the NO (normally open) pin of the relay module.
4. Optional: NodeMCU and DHT11:
- Connect VCC and GND pins of the DHT11 to 3.3V and GND pins of NodeMCU, respectively.
- Connect the data pin of the DHT11 to any digital pin of NodeMCU (e.g., D2).
Code Implementation
The provided code handles the logic and functionality of the smart irrigation system. Here's a summary of its key aspects:
- The code begins by including the necessary libraries for Wi-Fi connectivity, HTTPS communication, sensor readings, time synchronization, etc.
- It defines the pin mappings for the moisture sensor and water pump.
- Wi-Fi network credentials and Appwrite details are specified.
- The setup() function initializes the system, including Wi-Fi connection, time synchronization, and NTP client setup.
- The loop() function continuously reads the moisture level, controls the water pump based on the moisture level and time, calculates the amount of water pumped, and sends sensor data to the Appwrite platform at regular intervals.
- The connectToWiFi() function handles the Wi-Fi connection process.
- The getNtpTime() function retrieves the current time from an NTP server.
- The sendSensorData() function sends the sensor data to the Appwrite platform via an HTTPS POST request.
HTTP POST Request Info
HTTP POST request is one of the methods in the Hypertext Transfer Protocol (HTTP) used to send data from a client to a server. It is commonly used when there is a need to submit data to a server for processing or storage. Here's a brief overview of how an HTTP POST request works:
1. Request Structure:
- The POST request consists of an HTTP header and an optional request body.
- The header contains information such as the request method (POST), the content type, and the content length.
- The request body holds the data being sent to the server. It can contain various formats, such as JSON, XML, or form data.
2. Sending Data:
- In the context of the smart irrigation system code, the sensor data (moisture level, pump status, etc.) is collected and formatted as a JSON object.
- The JSON object is serialized into a string format using the ArduinoJson library, creating the request data to be sent.
3. Establishing a Connection:
- The code establishes a secure connection with the Appwrite platform using HTTPS.
- The connection is made to the specified endpoint (e.g., "cloud.appwrite.io") and port number (e.g., 443).
4. Building and Sending the Request:
- The request string is constructed, including the necessary headers and data.
- The constructed request is sent to the server using the print() function, which writes the data to the established connection.
5. Handling the Response:
- The code waits for a response from the server, typically by checking if data is available to read from the connection.
- If a response is received, it is read line by line and processed accordingly. In the given code, the response is printed to the serial monitor.
6. Closing the Connection:
- Once the request is sent and the response is received (or a timeout occurs), the connection is closed using the stop() function.
- Closing the connection ensures that system resources are freed up and subsequent requests can be made if needed.
Hardware Demo
Hardware Setup
Hardware Working Demo
Frontend Demo
Web Demo
Android Demo
MizunoHana Dashboard
Log In
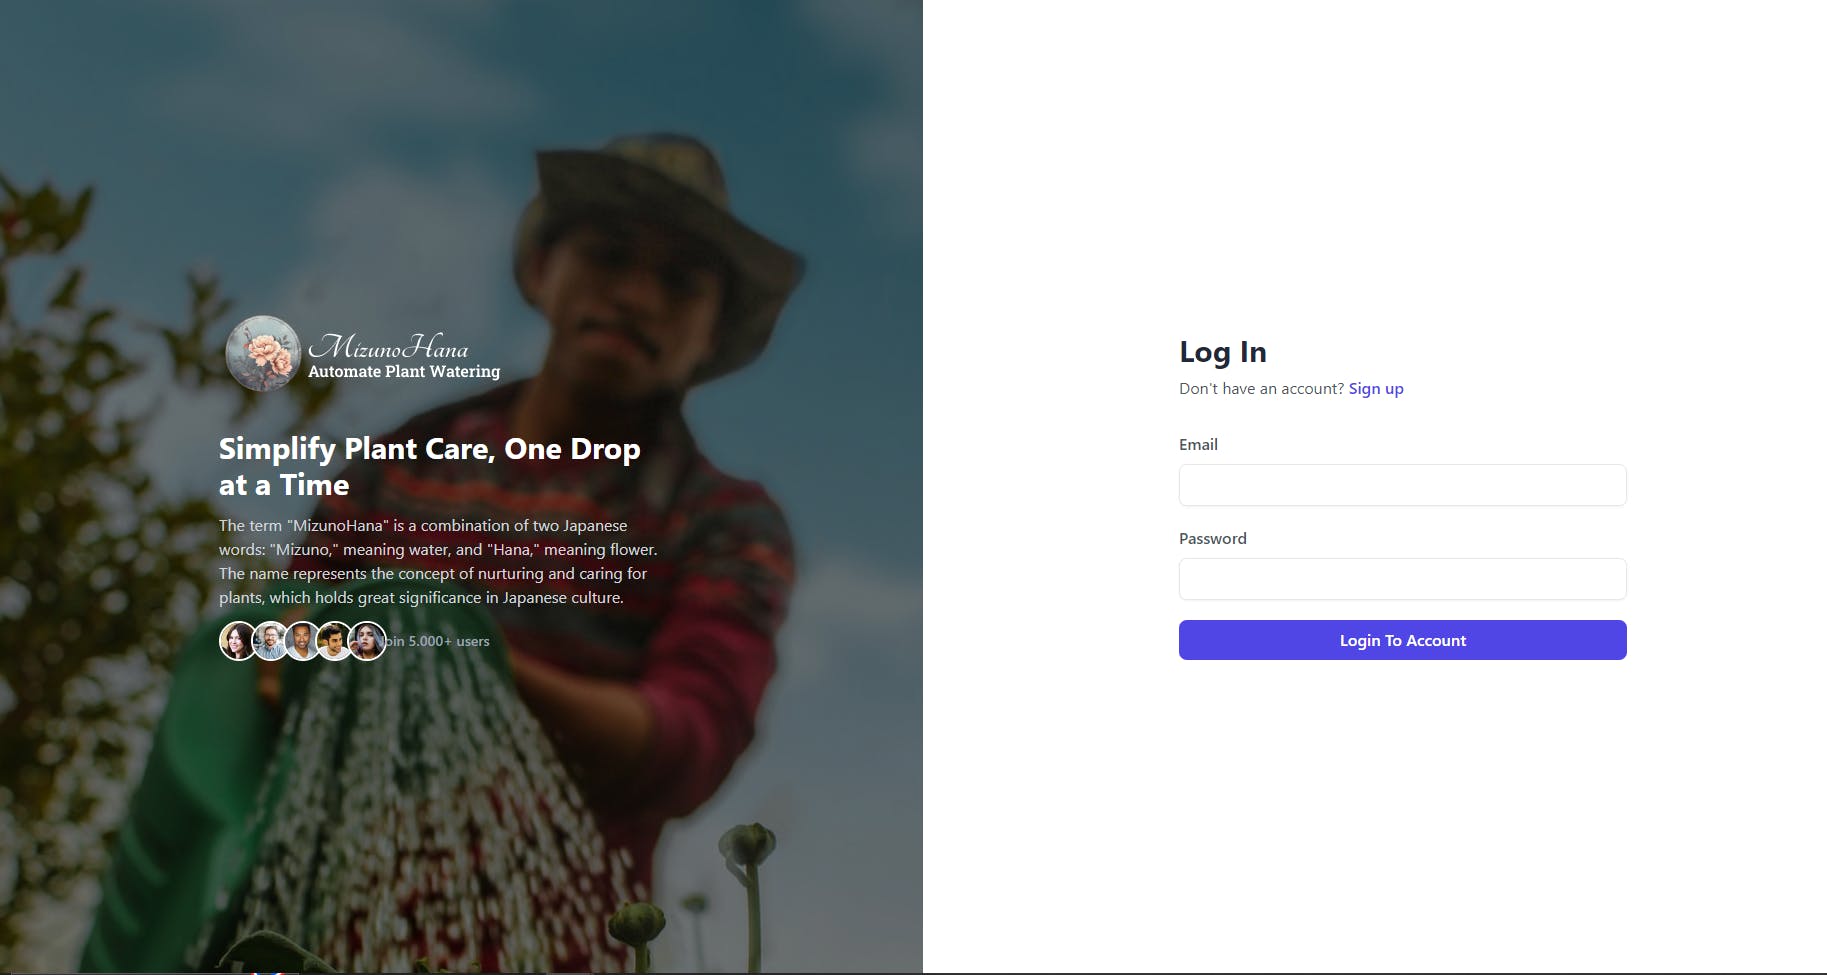
To log in to the dashboard and explore the demo, you can use the provided credentials. Alternatively, you can create an account on the signup page.
Email: admin@gmail.com
Password: 123123123
Sign Up

Dashboard
The MizunoHana dashboard gives you a quick summary of important plant care information. Users may simply track soil moisture levels, daily water supplied to the plant, last watering session and date, and pump status. A gauge chart graphically displays the current soil moisture level, allowing for quick and easy plant hydration monitoring. Plant owners may keep informed and provide best care for their plants by using the MizunoHana dashboard.
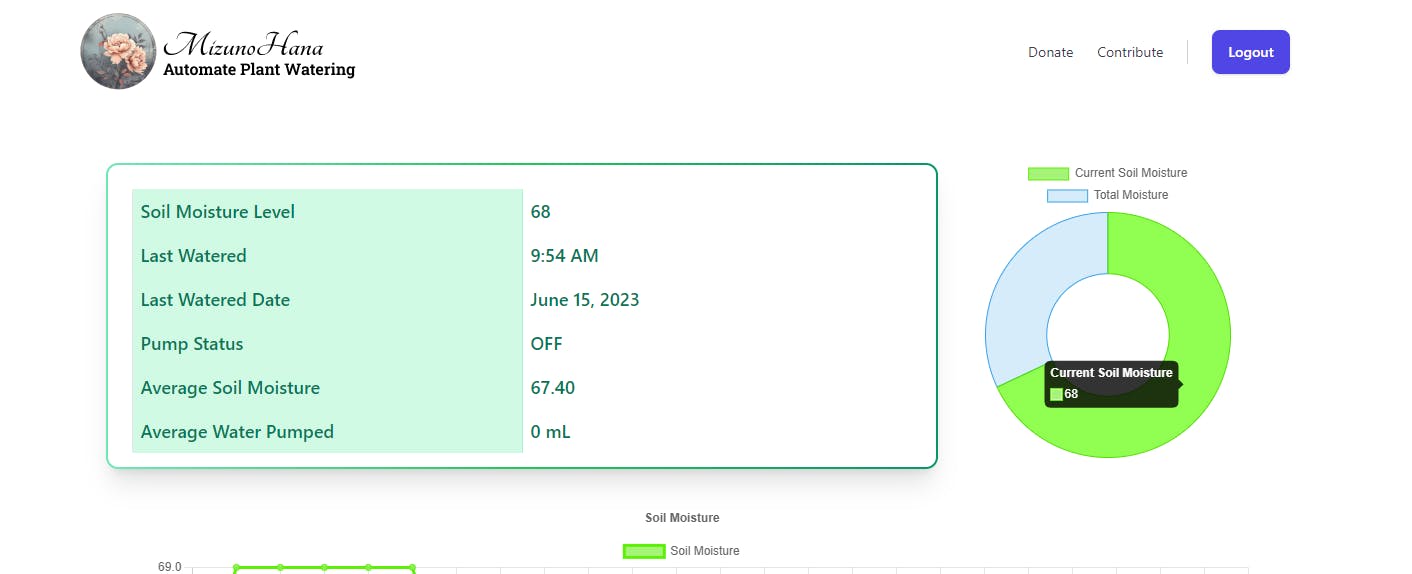
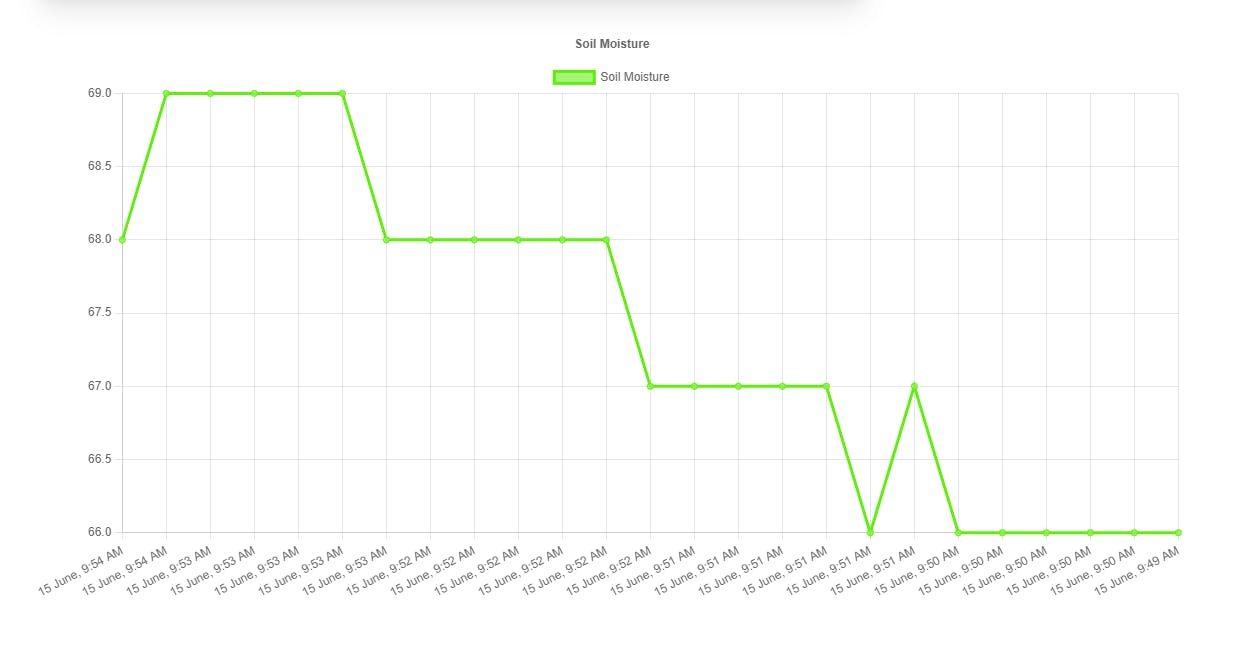
A handy line chart can also be used to analyze soil moisture trends throughout the day. This function enables plant owners to spot patterns and make smart watering decisions.
A handy bar chart allows users to visualise the trends of pump activation throughout the day. A tabular format exposes raw data saved in the database to individuals wanting more specific information, providing a full picture of watering events. Users may simply track pump start patterns and delve into specific data for a deeper knowledge of their plant watering habits by combining the bar chart and table. The MizunoHana dashboard provides customers with useful tools for efficiently optimising their plant care routines.

Please let us know what you think of the project💖. Feel free to comment or reach out to me if you have any questions.